Let's say you have an agent with a number of clips already defined.
It's very useful to playblast the agent, as it plays the animation in each clip.
It's possible to manually place agents and change the clip of each agent, but that can be laborious and we want to do things procedurally, do we not?
- In a fresh scene, lay down a Geometry object, rename it 'Agents'. Inside it, lay down an Agent SOP node. Point Agent Definition Cache to where the Agent definition is located, so that the agent is loaded into your scene.

All the Agent's clips will be available in the Current Clip dropdown menu.
- Drop down an Attribute Wrangle node.
The Wrangle will create an array from the Clip Catalog.
Then, it will create a point for each clip.
Each point will have a string attribute, containing the name of one clip from the catolog.
The 'addpoint' VEX function is also reading a parameter added to the Wrangle node.
The 'seperation' parameter changes the distance between each point.
I have decided to arrange all the points along the x-axis. This made sense for me as all my clips are aligned along the z-xais.
The Geometry Spreadsheet shows all the points created and the string attribute 'catalogClip'.
This attribute will be used later. - Next, use a Foreach loop to place an agent on each of the points.

The Foreach node is using 'Fetch Piece or Point' as the Method
The Crowd Source node is reading the 'catalogClip' attribute from each point and using that string value to set the Initial State.
Gotcha! The VEX function to do this is 'points()' and NOT 'point()'. Note well the extra 's' in the function name. This is a variation of the point() function that handles string attributes.
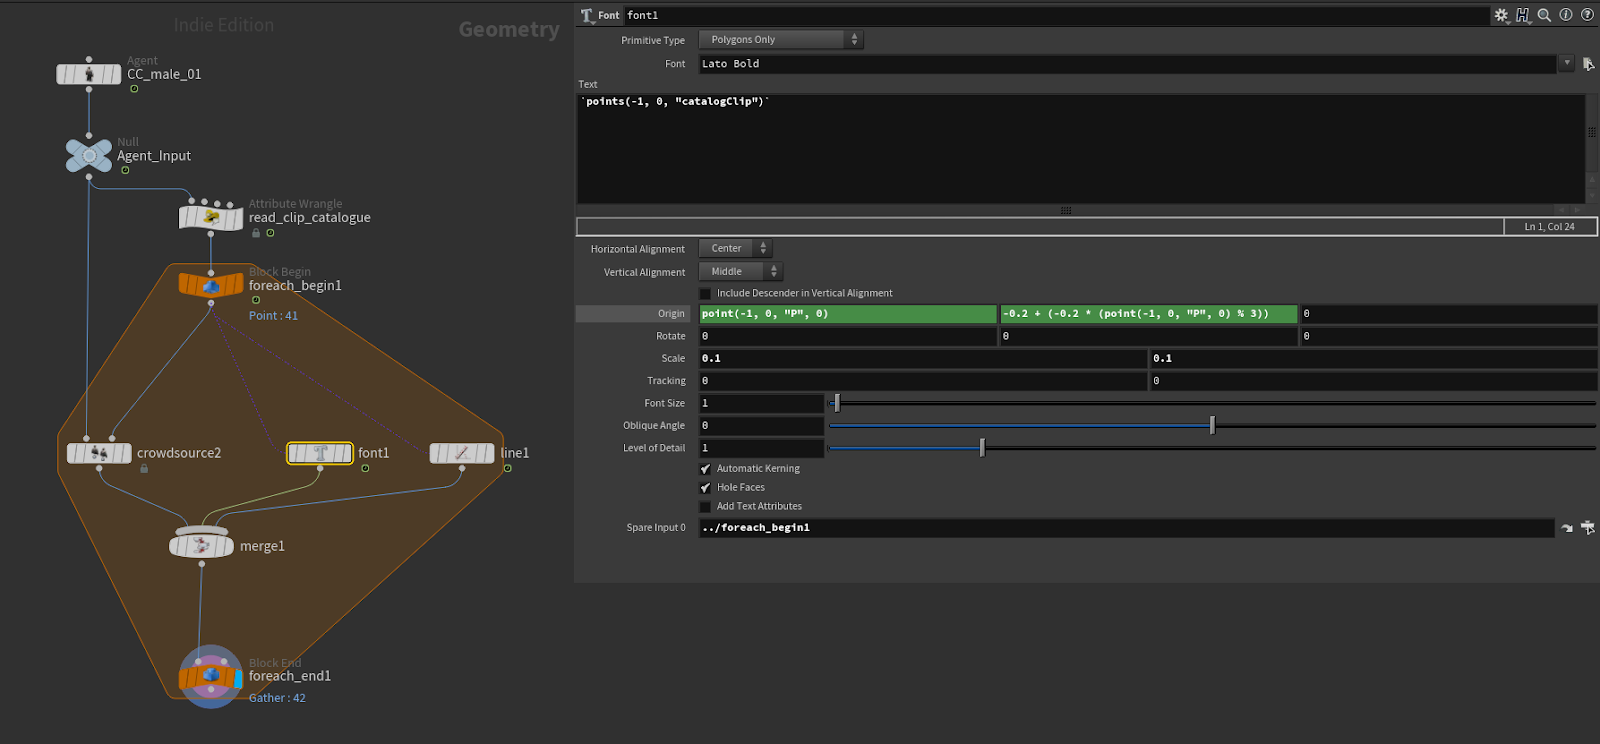
To label the clips, use the Font node to generate text.
The Font node can read data, not just text. It requires the data to be evaluated, using the back-ticks (`)
The Font node does not take an input, so to get data into it, use a Spare Input.
Using the cog menu at the top of the parameter pane, choose Add Spare Input.
Drag the Block Begin node from the Foreach loop into the newly created Spare Input field.
That allows the Font node to read data from the geometry going into the Foreach loop.
The data we need is 'catalogClip', so the syntax to read that into the Font node is:`points(-1, 0, "catalogClip")`
Here, the first parameter is -1, which tells the node to read the first Spare Input.
The text generated by the Font node needs to be translated to the location of each point.
The expressions in the 'origin' parameter reads the "P" attribute of each point.
The y component of the origin is using the modulus operator (%) to stagger the position of the text to avoid overlapping text.
If required, a line can be drawn between the text and the point, to clearly show which text comment references each Agent.
The line node will draw a poly line from a point, in a specified direction.
I used the same location as the Font node for the 'origin' parameter, only I raised the y-position by a small amount.
The direction is simply (0,1,0)
The length of the line is just the y-origin, multiplied by -1. - Merge the three elements and connect the merge to the first input of the Block End of the Foreach loop.
- Add and Agent Terrain Adaptation node to apply foot locking.

For this to work, an Agent Prep node needs to specify the IK chains for the legs.
I copied the one from the Agent Definition HIP file (along with the associated CHOP Network)